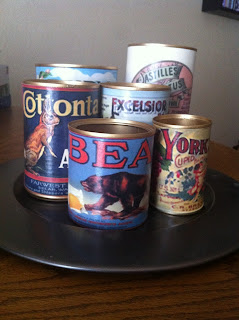
I've never been one to recycle or actually look at things I have thrown away and think I could do something cool with that until... Pinterest. Yes, I said it! I'm one of those Pin junkies! I mean look at all the cool things people are doing with things I just throw away and never think twice about. For instance... these vegetable cans.
I have to thank http://lilyboxdesigns.blogspot.com/2009/12/vintage-freebies.html for the inspiration on this project. I, like most people in her comment blog, had a hard time finding the labels she used for her cans, but that did not stop me. I was on a mission to make these. So I went to my trusty search engine, yahoo this time, and searched for free vintage labels. The main ones I used were found here here and the pink eucalyptus apothecary label I used. I right clicked on the labels I found and opened them in Paint where I edited them. I then pasted them in Word to stretch them to the size I was wanting and then printed. There are several options out there, so just pick the labels that you like.
First thing I did was take the paper off, rinse the cans and send them through a load in the dishwasher. Be careful if hand washing! Some cans have an inner rim and can be sharp :)
Supplies needed:
cans
Mod Podge ($3 for small bottle @ Michaels)
foam brush (25 cents @ Michaels)
printer
extra scrapbook paper
double stick tape ($2.50 @ Hobby Lobby)
spray paint in color of choice (if want- $4 @ Lowe's)
Once the cans were clean, I took one of the labels and used double side tape to hold it in place. Now, unless you find an awesome label that fits all the way around the can, you are going to have a gap in the back. Here is where the scrapbook paper comes in. I went through my scraps of paper and found solid page colors that matched the labels and cut a piece to fill in the gap and taped it down (shown below).
Now this is what the can looked like with just that. If you like the way this looks (which I initially did because the can had some rust on it & made it look rustic) then just mod podge with a brush over it to seal it and Voila! You're done! I however was looking for something more classic looking... so I took the label off (hadn't sealed it yet) and went to find some spray paint.
Valspar Metallic in Gold
I sprayed the inside first and let sit for few minutes. The paint dried within minutes... sometimes the humidity in Texas is a good thing. Then placed a stick inside(so wouldn't get any on my hands) and turned them upside down and sprayed the outside. Again, only a few minutes to dry.
Next, came putting the labels on the all the cans and filling in the gaps with the extra scrap paper. I was nervous what it was going to look like with the plain paper in the back, but it came out great!
After all the cans were taped with their labels, I used a foam brush and brushed mod podge over all the cans to seal and keep the paper together. My mod podge was glossy so I have some shine to mine.
My completed "vintage" cans!
I had this tray that at one time held candles and was perfect for these cans. I was looking for something for my craft desk that was vintage looking for putting pens, scissors and other misc items and this is going to look great. All in all, this project took 2 hours and cost me nothing since all items I already had. If you didn't have the items, under $10 to make and you'd have leftover supplies for another project!
Once I get my craft area all done, I'll post pictures of all these pieces in action.
Till the next inspiration...


No comments:
Post a Comment