Monday, June 17, 2013

Rolladesk make-over

First major upcycle project!!!
 
So it all started at a local Goodwill just looking for furniture or small things to make-over (you know how these stories go) and my mother and I ran across this desk for $14.99. Wow, I initially thought, I could turn this desk into a cool new craft table for me... after shortly playing around with the desk, it turned into a project for a new desk for my mother :) Desk itself was in pretty good condition, but the roll down part of the desk was broken. No worries cause my plan for this desk doesn't need it!


No inspiration for this desk except what I had in my head, but I did have a paint technique that I had read about that I was really wanting to try and what better piece than this to try it on, but I'll get into that later.
 
First thing first... I wanted a flat top desk so OFF with the top!


Amazing what we lose behind our desk-yuck! I'm going to invest in some gloves if I keep up with used furniture make-overs :)
 
So once I got the top off... now starts the fun!!!
 
Materials used
wood graining tool (Allway brand is what I went with because there were 3 different tools which I found at Sherwin Williams for $3.56 (it was 30% off!))
Valspar Mudslide in flat with primer ($26.97 @ Lowe's)
Valspar clear glaze ($16.77 @ Lowe's)
Sherwin Williams Sand Dollar in Matte ($12.59/quart- was 40% off!)
hardware ($14.70 @ Lowe's)
Elmer's wood filler ($3.48 @ Lowe's- if need)
Minwax Polycrylic gloss ($10.49/quart @ Sherwin Williams- 30% off!)
sander
brushs (Lowe's)
 
**First time I ever shopped Sherwin Williams and I'm so glad I did! They were very helpful and they were having a wonderful sale!!!
 
** Overall, all the supplies cost me roughly $70 and 7 hrs to complete + drying time**
 
Step 1: Once I took the top of the desk off, I took off all the hardware. (Hint: Even if getting new hardware, keep the old hardware till end of project) I then sanded down the entire desk.
 
 
Step 2 (if needed): Since I was removing a top section of the desk. I was left with the holes where they were held together. So I filled the holes with Elmer's wood filler. Once dry, I sanded it down to desk level.
 
 
close-up of the filled holes


Step 3: Next I painted the desk with Valspar Mudslide in flat. (Love paint with primer- only took 1 coat)


Step 4: Remember that awesome paint technique I mentioned earlier that I couldn't wait to try... well, here goes. I followed Recaptured Charm's directions by mixing my Valspar clear liquid glaze with the Sherwin Williams Sand Dollar in Matte with a 4:1 ratio. I used a cup for my measurement so as not to waste any paint or glaze & it was plenty of mixture for the desk. I then painted the desk with the mixture and followed it by running a dry brush through the paint. Then, grab the fine tooth side of your wood graining tool and run it down the whole surface. Now go back and drag the tool rocking it back and forth as you drag it along the desk. (Tip Recaptured Charm gave & I second: The more you rock the tool, the more grooves you'll create, but don't overdo it. If you do, simply paint over and start again). Let glaze slightly dry, then drag your dry brush through the glaze pulling it to soften the look (this really completed the look!)


Step 5: Once, desk was completely dry, I sealed the desk using a brush and the Minwax Polycrylic in gloss. Couple hours later after it dried, I sanded down the desk slightly and resealed the desk again.
 
Step 6: After desk has dried, I added the new hardware. (I used 6- 3" Traditional Bow Pulls and 4- 1 1/2" Provincial Knobs from Lowe's if curious) Now the hint I gave about keeping the old hardware made it easy to take to Lowe's to make sure my sizes were correct for the new hardware without having to measure, but most importantly is the screws that came with new hardware were too small! Eek! Thankfully, I also kept the screws to the old hardware and was able to use those with the new hardware or I would have had to go back for longer screws! See honey I do listen to you... sometimes :)
 
Finished Product!


For my first major furniture re-do I think it came out very well.
Let me know what you think...
 
Before and After
 
 
Till my next inspiration...


Thursday, June 13, 2013

"Prayer Changes Things" Sign

This is the first for me... Normally I see things that inspire me to try to make my own, but this time I was approached with a picture of an inspiration and asked to make. Here was my MIL's inspiration that she saw at a craft fair and wanted me to make for a relative...
 
 
Materials used:
9X16 wood board
wood cross ($3.99 @ Hobby Lobby )
small wood cross ($2.99 @ Hobby Lobby for a bag of 8- got 40% off)
Valspar spray paint in brown ($4.79 @ Lowes)
Anita's All Purpose Acrylic paint in Antique White ($1.99 @ Hobby Lobby)
Weldbond glue ($3.99 @ Hobby Lobby)
Minwax Fast Drying Polycrylic (Lowes)
Elmer's painters pen in Brown Brun Cafe (Hobby Lobby)
foam brush, art brush
Cricut with Type Candy Font cartridge
sander
 
*** Some of these items I had on hand so can't give you price, but roughly cost $20 and 2 hrs to make + drying time**
 
Step 1: I cut the wood to the 9X16 size (just a size I picked based on the size of the crosses) and sanded the edges. I then spray painted the wood with the Valspar spray paint in brown and let dry. Once dry (few minutes), I painted the front of the board with Anita's All Purpose Acrylic paint in Antique White and let dry. I did not paint a thick layer over the brown because I wanted the brown to come through.
 
 
Step 2: Next I painted the 2 crosses that I picked out with the art brush. Now don't get mad at me, but I cannot tell you the exact colors or type of paint I used. I love to use things I have lying around when I do crafts so... I had some acrylic sample paints that come in these little containers that are glued together (don't know exact term for these), but you can see in picture below. I let the crosses dry (few minutes) and then glued them together using the Weldbond glue.
 
 
Step 3: I glued the crosses onto the board using the Weldbond glue. 
 
 
Step 4: Now you can use whatever you want for your font, but I used my Cricut machine for this project. I got this new cartridge called Type Candy Font 50% off @ Michael's and was dying to use it! So I cut the letters in the Better with Chocolate font and placed them how I wanted them on the board.
 
 
Step 5: I traced the letters using the Elmer's painters pen in brown.
 
 
Step 6: Seal the wood with Minwax fast drying poly and let dry.
 
The finished product...
 
 
I like the finished product, but if I had more time, I think I would have gone back & added some detail to the crosses- don't know. Ended up adding a sawtooth hanger on the back so it could be hung on the wall. The people I made it for greatly appreciated it and actually got a smile during a hard time so that made it all worth it. Hopefully it will be a constant reminder for them and anyone else who reads it!
 
Till my next inspiration...

"I'll love you forever" baby frame

 
Sorry I have been away from my blog for a few months. We found out we were expecting baby #2 and hubby got a new job which is requiring us to move! Oh My! But never the less, let me try to catch you up on my recent projects...
 
 
I love this project! This has to be my favorite so far and I couldn't have made it for such a nicer couple. They have been married for 11 years and have been trying to have a baby with no luck... till now!!!
 
 
Inspiration:
 
Picture Frame Personalized Picture Frame 16x16 I'll LOVE YOU FOREVER Baptism Christening First Birthday Gift Godparents The Sugared Plums
 
I saw this frame on etsy and absolutely fell in love with it! However, I did not want to spend that much so went about seeing if I could make my own. I loved the turn out! Here's how I did it...
 
Materials used:
11X12 piece of wood
12X12 piece of scrapbook paper ($0.59 @ Hobby Lobby)
Fine point Sharpie marker in brown ($1.99 @ Michaels)
printer
4X6 frame ($2.97 @ Walmart)
"light" box (will explain later)
Elmer's glue-all ($2 @ Walmart)
2 foam brush ($0.25 @ Michaels)
Weldbond glue ($3.99 @ Hobby Lobby)
Mod Podge in Matte ($4.47 @ Walmart)
Folk Art acrylic paint in Bark Brown ($0.97 @ Walmart)
brush ($0.99 @ Lowes)
sander
credit card (or any tool you have to smooth out bubbles)
easel ($12.99 @ Hobby Lobby- got it 50% off so $6.50)
 
If you have some of these items, then your total will be cheaper, but if not the total is roughly $30 to make and a total time of 3 hours to complete!
 
Step 1: I chose a green scrapbook page because it was for a boy with a camo room, but any paper that fits your theme will do. Now with making a frame that's so big you're wondering how I did the font. Well I was wondering how I was going to do it too. I have a basic printer like most people and the biggest page it prints is a 9X11. So after playing on the computer I came up with printing the lettering in landscape and printed it over 2 pages that I taped together after I placed it the way I wanted it on the page. (I was contemplating going to Kinko's and seeing if they could scan it on the paper for me, but unsure if that's something they could do and if I would get the results I wanted... more research needed)
 
I created this "light box" which is a 12X12 scrapbook storage container with a strand of Christmas lights inside :) Learn to improvise! I then placed my scrapbook paper over the printed font and traced the letters with the fine point Sharpie in brown.
Here's how it looked...
 

Side view...


I used Edwardian Script ITC in size 95 and bold. Here's what the paper looked like after I added the font. I added the name of the child to the bottom for more personalization, but just a preference. (Hint: Cut the paper to the size of the board before you start. Yes, I thought my board was 12X12 till I put the paper up to it- eek! Thank goodness I had plenty of space on the side so it was easy to adjust for the 1 inch I was off)
 
 
 Step 2: I glued the paper down onto the board using Elmer's glue-all and spread it with a foam brush. I then used the side of a credit card to smooth out any bubbles that were created. If you have a smoother tool by all means use it. Again I improvise with what I have around :) 

 
After glue had dried, this was my product. Loving it so far...

 
Put my picture frame on the board to make sure everything looks good, before I continued. Learning from mistakes here :)
 
 
Step 3: I wanted to distress the frame so I sanded the edges of the frame and paper with my sander (hand sandpaper would work too). Then, grabbed a brush and used the Folk Art acrylic paint in Bark brown and painted the edge of the wood allowing my brush to come up over the paper in some parts. I love how it added age to it.

Step 4: Once paint dried (very quick), I used a foam brush and painted over the wood with the Mod Podge in Matte and let dry.

Step 5: I then glued the frame down in place (add the picture before hand) using the Weldbond glue) and placed heavy books (again improvise) down on it to help hold it together while it sealed.

 
The finished product...
 
 
I so want one of these made for me now after seeing how it came out! I added an easel to it because I wanted it to be something they could display, but you could add a sawtooth hanger if want to hang on the wall. The only thing I want to learn before I make another one of these is how to be able to change out the picture (like my etsy inspiration), but wood working skills are still in work! But I think for any baby photo frame, this is perfect, because who is going to change out their baby's picture ;)
 
Till my next inspiration...


Wednesday, March 6, 2013

College Survival Gift Basket

So the time has come when your child must leave the nest... thank goodness I do not have to know how this feels for 17 more years! But, it's just as hard when your kid sister goes off to college... especially when there is a 10 yr age difference. Yep, the big 3-0 is not too far down the road for me. Back to happy thoughts :) So being the big sister that I am, I wanted to get her something nice and that she's going to need for college. And... being the big sister that I am... it had to be down right funny!
 
We made 2 baskets- 1 for my sister and 1 for her friend
 
Inspiration from: funkypolkadotgiraffe who created a super cute back to school survival basket for her kid's teacher and giftsucanmake for a survival kit for sisters.
 
So I got with my mom and we brainstormed, then went shopping! Honestly, it was quite fun making. We had an idea for most of the items, but others just came up with on the spot so forgive us if some are just super corny.
 
 
Our items and its corny uses (sisters basket) :
 
BAND AIDS for when things get a little rough
CHEWING GUM to help you stick to it
CRAYONS to color your day bright and cheerful
ERASER to remind you everyone makes mistakes
LIFE SAVERS for when you've had one of those days
KLEENEX for when your day just blows
UNDERWEAR to remind you it is time to do laundry (haha sister in me)
RULER for when you need to be slapped straight
AIR FRESHENER for when life stinks
TWIZZLERS for life's little twists
PAPERCLIPS to hold it all together
HAND SANITIZER to keep you healthy and happy
GLOBES for when you feel powerless (found squishy globes to squeeze- DT)
FIRST AID kit for life's little emergencies (accident-prone sis used within the week)
POP-UP flags to help you find your place
BUBBLES to help you get away
FLARP for when there's no one else to blame (haha its putty and sounds like gas when squeeze it)
PICTURE FRAME for when you're homesick
ICE PACK to help you keep your cool
CUP to help you suck it up (Travel cup with straw)
FLOWERS to brighten your day (yes they were black- sister humor- DT @ Halloween)
STAR BURSTS to give you a "burst" of energy
TOOTHPICKS to help you "pick out" the good qualities in others and yourself
MARBLES to replace the ones you lost :)
 
 
Other basket contained some of the above, but was altered for a boy:
 
SOCKS to remind you its time for laundry (great alternative if not family)
CAR SAVER PEN to save you a call back home
STICKY TUMBLER to remind you to be flexible (one of those sticky men you throw on the wall)
TOOTHBRUSH to wash away the cobwebs :)
 
 
The baskets were found @ Dollar Tree (DT) as were about half the items. The baskets and tissue paper inside were their college colors. So lucky they had those baskets in those colors. The rest of the items were found @ Walmart. Thankfully it was back-to-school time so they had a lot of school supplies to help personalize the gifts more (Superman, Hello Kitty, etc) and make it that much funnier.
 
All in all, it cost about $50 to make both. Very fun to make and a lot more personal gift in my opinion.
 
Best of luck in college, Michaela and Colby! Go Islanders!
 
Till the next inspiration...


Upcyle Those Cans!

I've never been one to recycle or actually look at things I have thrown away and think I could do something cool with that until... Pinterest. Yes, I said it! I'm one of those Pin junkies! I mean look at all the cool things people are doing with things I just throw away and never think twice about. For instance... these vegetable cans.


I have to thank http://lilyboxdesigns.blogspot.com/2009/12/vintage-freebies.html for the inspiration on this project.  I, like  most people in her comment blog, had a hard time finding the labels she used for her cans, but that did not stop me. I was on a mission to make these. So I went to my trusty search engine, yahoo this time, and searched for free vintage labels. The main ones I used were found here here and the pink eucalyptus apothecary label I used. I right clicked on the labels I found and opened them in Paint where I edited them. I then pasted them in Word to stretch them to the size I was wanting and then printed. There are several options out there, so just pick the labels that you like.
 
First thing I did was take the paper off, rinse the cans and send them through a load in the dishwasher. Be careful if hand washing! Some cans have an inner rim and can be sharp :)
 
Supplies needed:
cans
Mod Podge ($3 for small bottle @ Michaels)
foam brush (25 cents @ Michaels)
printer
extra scrapbook paper
double stick tape ($2.50 @ Hobby Lobby)
spray paint in color of choice (if want- $4 @ Lowe's)
 
Once the cans were clean, I took one of the labels and used double side tape to hold it in place. Now, unless you find an awesome label that fits all the way around the can, you are going to have a gap in the back. Here is where the scrapbook paper comes in. I went through my scraps of paper and found solid page colors that matched the labels and cut a piece to fill in the gap and taped it down (shown below).
 
 
Now this is what the can looked like with just that. If you like the way this looks (which I initially did because the can had some rust on it & made it look rustic) then just mod podge with a brush over it to seal it and Voila! You're done! I however was looking for something more classic looking... so I took the label off (hadn't sealed it yet) and went to find some spray paint.
 
Valspar Metallic in Gold
 
 
I sprayed the inside first and let sit for few minutes. The paint dried within minutes... sometimes the humidity in Texas is a good thing. Then placed a stick inside(so wouldn't get any on my hands) and turned them upside down and sprayed the outside. Again, only a few minutes to dry.
 
Next, came putting the labels on the all the cans and filling in the gaps with the extra scrap paper. I was nervous what it was going to look like with the plain paper in the back, but it came out great!
 
 
After all the cans were taped with their labels, I used a foam brush and brushed mod podge over all the cans to seal and keep the paper together. My mod podge was glossy so I have some shine to mine.
 
 
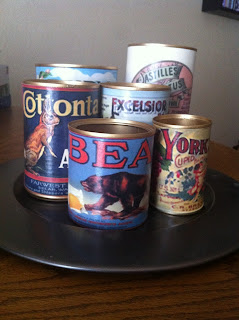
My completed "vintage" cans!


 I had this tray that at one time held candles and was perfect for these cans. I was looking for something for my craft desk that was vintage looking for putting pens, scissors and other misc items and this is going to look great. All in all, this project took 2 hours and cost me nothing since all items I already had. If you didn't have the items, under $10 to make and you'd have leftover supplies for another project!
 
Once I get my craft area all done, I'll post pictures of all these pieces in action.
 
Till the next inspiration...


Tuesday, March 5, 2013

Valentine's Day Wood Sign


I love this piece I saw on pinterest and just knew I wanted to make it for our own house. I had to agree with the artist, I'm much more partial to red pieces when it comes to decorating my house than the traditional pink for Valentine's Day.
 
 
I'm going to tell you how I made mine, hopefully best I can step-by-step,
so you can attempt your own or if you like... Landee makes and sells hers on etsy for $34.
 
Supplies Needed:
10x24 wood board, 3/4 inch thick
Liquitex Acrylic Basics in Naphtol Crimson (Hobby Lobby)
Liquitex Acrylic Basics in Mars Black (Hobby Lobby)
foam brush (25 cents Michaels)
thin paint brush (basic brush from paint art supply)
brush to seal with ($1 Lowe's)
Anita's All- Purpose Acrilic Antique White
Cricut
Cricut cartridge Plantin Schoolbook in shadow font
twine (any string or ribbon in color of chosing)
scrapbook paper
Minwax Polycrylic Satin (Lowe's)
 
I had all these supplies on hand so I cannot give you an exact price on how much each thing cost.
You can use any stencil you want if you do not own a Cricut. I liked the ease of it so that I could make different sizes, but again not necessary.
 
 
1) Cut your piece of wood to your desired length. I used the 10x24 since it was the dimensions  Landee used and I like the length, but again, you can cut yours to the size that fits your space.
 
2) Paint the wood. I painted a base color of the Liquitex Acrylic Basics in Naphtol Crimson and let dry for few minutes, then added a few drops of the Liquitex Acrylic Basics in Mars Black and painted over the base color. I love the rustic look it gave to it instead of having just one color. Again, personal preference.
 
3) I then used the Cricut and cut out my words. For me, I like to use the actual letters and place them out first to make sure size and placement works. Then I use the word part for a stencil and fill in the letters using the Anita's All-Purpose Acrylic in Antique White with a thin paint brush. It does not take long to dry so by time, I was finished with the word and got the letters in place for the next word, it was dry. I did not worry about getting the letters filled in exactly or perfectly. The paint is thin in some areas. I did this to add to the rustic charm I was going for.
 
4) *If want step* I then took my sander and sanded a few areas to age it more.
 
5) Seal the wood sign with a brush and Minwax Polycrylic in Satin. Leave to dry for few hours.
 
6) Grab your twine or ribbon and wrap it around the board leaving the start and end piece in the front. I had this red & silver twine left over from an art project I did in 3rd grade if you can believe it. No I'm not a horder, I just have always loved crafts and kept pieces here and there as I was growing up for future projects... like today! Anyways I was super excited to finally have a use for this twine (dork I know). Unfortunately, the red in the twine does not stand out as much as I would like, but for now it stays :)
 
7) Cut out a heart from any scrapbook paper you have lying around. I had a small piece left over from a Valentine's scrapbook page that was red with black and white hearts on it. I used my Cricuit again to cut the heart, but any heart stencil you have or the original fold paper and cut half of heart will work too. Then take your heart and punch a hole near the top in the center. Thread the piece of twine that you left in the front of the wood thru the hole and tie it with the other end of twine.
 
You're done! All in all took about 7 hours (mostly for drying time).
 
 
Ours ended up by our bar and I added a few red and pink tulips for decoration.
 
 
It ended up perfect!
It fits our decor so well and isn't overly sappy or to girly for my husband.
 
Till the next inspiration...

Repurposed Goodwill Frames: Bathroom

Been in the process of helping my mother redo her condo.
It's been a few years in the making, but its slowly coming along.
In our recent trip to Goodwill, I found these white box frames that in itself
had no design purpose, but the frame had potential.
Got them for $3 a piece so figured worth a try.
 
front
back
Trying to take it apart was a little harder than I thought. They had placed tiny nails all along the side of the box to keep the back in place, but some needle nose pliers took care of that... eventually. You would think carrying a toddler around all day would give you upper body strength, but nope not the case. When finally got the back off the box, I had to get the box off the frame. It was glued to the frame and even though figured no one would see the back I still didn't want to ruin it. I tried running an exacto knife along the side of the glue- not a success, so don't ever try! So light bulb came on and I got a screw diver and popped it apart. Much better and much quicker. Don't ask why I didn't take a picture of it all taken apart... sorry. I promise I'll get better with my step-by-step pictures.
 
 
Supplies need for this project:
Frames ($3/each @ Goodwill)
Scrapbook paper (59 cents for 12x12 @ Hobby Lobby)
shells (already own)
clamps
Elmer's Glue-All (already own, but roughly $2 @ Walmart)
Elmer's Wood Glue (already own, but roughly $4 @ Lowe's)
Weldbond (already own, @ Hobby Lobby)
 
You can use any glue you have around in my opinion,
but these are the ones I had on hand and I liked how all of them worked.
 
 
On the back of the box (remember I took apart from the box frame) I used the Glue- All and brushed the back with glue. I then took a 12x12 scrapbook paper that I got from Hobby Lobby for this project, cut it to the size of the box back and laid it on the glue. I tried smoothing out the bubbles with a credit card, but ripped the corner (cannot see when I put the frame back on- yeah) so found out my fingers worked just as good and no rips! Once dried I used the wood glue and glued the back to the box frame. Then, clamped the back and frame overnight. Yes, that is a wrench being used as a clamp- don't judge :)
 
 
Next morning, I went through the shell collection my mom had and picked out the ones that I liked the most or had the most importance to my mom. Obviously because of the height of the box, it did limit my shells, but overall I think she got the ones she wanted. I then used the Weldbond glue and glued down the back of the shells. Takes an hour to bond, but bond is stronger longer you wait. After an hour I was able to turn them upside down and they held wonderfully! Next was to put the frame back on. Used wood glue and sealed the frame back to the box. Then, went old school and placed heavy books on top :) Hey, it works!
 
The final product!
 
Before & After
 
Did not take much work and only cost $7 to repurpose.
Simple, but perfect for the project in mind.
 
 
Here they are up on the walls in the bathroom. Believe it or not, the lantern was also found at the Goodwill ($3 still in its packaging) and filled with the remaining shells and hung with a cup hook from the ceiling.
 
So were did my inspiration come from...
 
Obviously, our project looks nothing like the inspiration, but at $195 each...
I think mine worked out just fine :)
 
 Till the next inspiration...